02
03
Pinewood Derby Stories and Photos from Maximum Velocity
04
05
15
16
19
20
21
22
23
24
25
26
27
28
31
32
33
34
Using a Mini-Lathe
Okay, I know that many of our readers will have no desire to ever use a lathe for pinewood derby car preparation. But for the small percentage of our reader's that would like to have a lathe (and for the readers who don't know if they would like one or not), today's article will give you an introduction to using a lathe to prepare pinewood derby wheels.
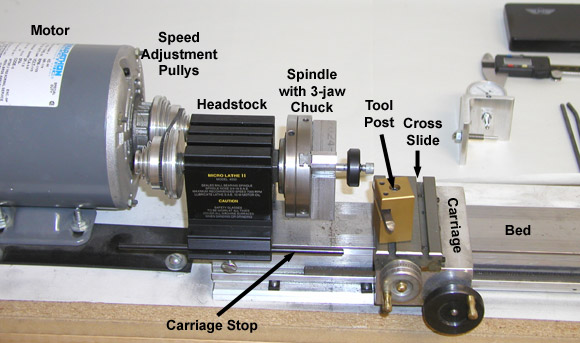
WHAT IS A MINI-LATHE? A mini-lathe is a small version of a machinist's lathe. A machinist's lathe is a power tool which rotates the target material (in our case a pinewood derby wheel) allowing it to be shaped with a cutting tool. Unlike a woodworker's lathe, where the cutting tool is held by hand, a machinist's lathe has a fixture (Tool Post) to rigidly hold the cutting tool, and a Carriage and Cross Slide to adjust the position of the cutting tool. (see Figure 1).
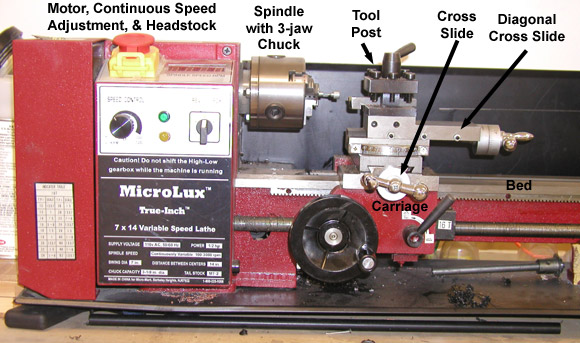
The configuration of lathes varies from model to model, but several key parts are always present. These parts are identified in Figures 1 and 2, and described below. Figure 1 is a photo of a Taig mini-lathe(1). Figure 2 is a photo of the more full-featured MicroLux mini-lathe(2).
Figure 1 - Taig Mini-Lathe
Figure 2 - MicroLux Mini-Lathe
Motor - A 110 V motor to drive the spindle. In the case of the MicroLux which has an optional carriage power feed, the motor also drives the carriage.
Speed Adjustment - Pulleys, gears, or a motor with an adjustable speed are used to vary the spindle speed.
Headstock - Contains precision bearings to minimize the amount of rotational error (run-out) in the spindle. Generally, higher quality (read "expensive") lathes have less run-out.
Chuck - Jaws to grasp the part to be machined. A three-jaw chuck is used to hold cylindrical items, and a four-jaw chucks for square items. Lathes can also be fitted with collets for small items.
Tool Post - Holds the cutting tool (high-speed steel or carbide). The tool post on the Taig lathe can be turned in any direction. The MicroLux tool post is limited to 90 degree increments, but the diagonal cross slide feature provides the additional adjustment to cover 360 degrees.
Cross Slide - Moves the cutting tool perpendicular to the work item.
Carriage - Moves the cutting tool parallel with the work item. The Taig lathe has a manual carriage. The Micro-Lux carriage can be moved manually or with the power feed. For pinewood derby wheels the power feed is too fast.
Bed - A precision ground support for the carriage.
Most lathes also have a tail stock (not shown in photos). The tail stock supports the end of long work pieces, but is not really needed for pinewood derby work.
USING THE MINI-LATHE ON PINEWOOD DERBY WHEELS The most common use of a mini lathe (as it relates to the pinewood derby) is to true the tread surface of pinewood derby wheels. This operation makes the wheel round and the tread smooth. But a mini-lathe can also be used to reduce the weight of the wheel and reduce the tread width (if allowed by local rules). Axles can also be prepped with the mini-lathe.
Truing the Tread Surface To true the tread surface, a wheel is mounted in a wheel mandrel, the motor is started, and the tool is moved across the tread surface removing a small amount of material. This is repeated until the wheel is fully cleaned up.
Here are some tips for truing wheels:
1. WEAR EYE PROTECTION AT ALL TIMES.
2. Chuck the Pro-Wheel Mandrel as far into the jaws as possible.
3. Set the Carriage Stop so that the tool or carriage cannot touch the jaws of the chuck.
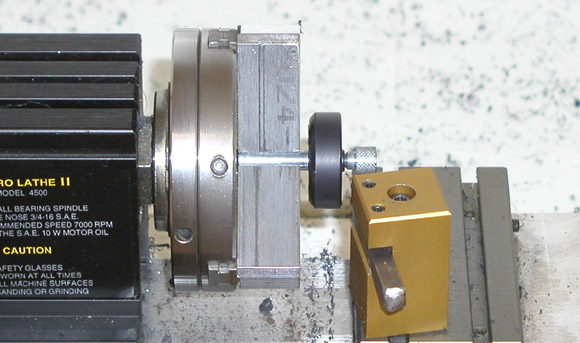
4. Set the cutting tool to a fairly low attack angle (see Figure 3).
5. Wheels made from harder plastics can be lathed dry (no coolant). However, wheels made of a softer plastics, such as those distributed by Awana, require application of water as a coolant. This can be done by an assistant with an eyedropper. But make sure to wipe up water right away as it can tarnish/rust the lathe bed.
6. Remove 2 to 4 thousandths of material on each pass. Remember that 2 thousandths (.002) of material removal results in a diameter reduction of 4 thousandths.
7. After the last material removal pass, make a final pass at the same depth, moving slowly and smoothly. This will provide a better finish on the tread surface.
8. To ensure consistency from wheel to wheel, take off a little more than is needed on the first wheel, and then note the reading on the cross slide. Machine the other three wheels to the same setting.
9. Always finish the tread truing process on a wheel before removing t from the lathe. Once a wheel is removed from the lathe, it is virtually impossible to re-mount it and remove just a few thousandths of material.
10. After using the lathe, apply a thin film of machine oil to the lathe bed, and lube the carriage and cross slide.
Figure 3 - Tool Attack Angle
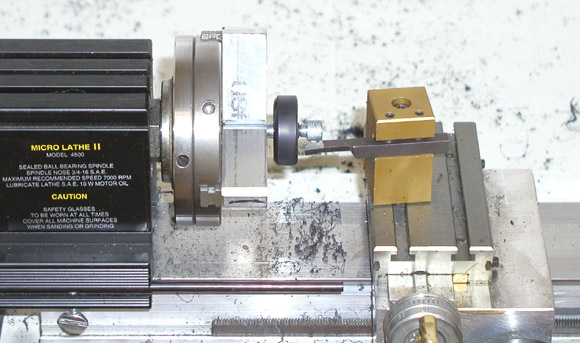
Figure 1 shows a raw wheel mounted in the lathe using a Pro-Wheel Mandrel. Figure 4 shows the finished wheel.
Figure 4 - Tread Surface Trued
Trimming the inside edge The inside edge of a wheel can be easily trimmed with the same cutting tool. But don't cut into the side of the wheel by moving the carriage horizontally. Instead, position the knife so that it will just barely touch the side of the wheel, and then use the cross slide to move the knife towards the bore. Back out the tool, and then check if the edge is trimmed enough. If more material must be removed, move the carriage a few thousandths and repeat.
Removing Weight Weight can be removed from the underside of the tread surface by repositioning the cutting knife as show in Figure 5. You may need to use a different knife in order to get clearance on the wheel. Some cutting knives will drag on the wheel before the cutting edge makes contact. I use a knife that has a 90 degree radius on the bottom, which allows for adequate clearance.
Position the knife to just barely touch the inside of the tread surface, and set the carriage stop so that the knife doesn't cut through the sidewall of the wheel. Then start the lathe and move the carriage left and right. Then move the cross slide out a few thousandths. Eventually, you will thin the tread enough to get a noticeable weight reduction. With the proper cutting tool, and proper positioning, the hub can be narrowed and the inside sidewall thinned.
Figure 5 - Weight Removal Reducing Tread Width If allowed by local rules, the tread of the wheel can be reduced in width, resulting in a large mass reduction. This can be accomplished by repeated trimming of the inside edge. But a faster way is to use a cutoff tool (see Figure 6) to cut through the tread.
Position the cutoff tool to run perpendicular to the tread surface. You will need to apply water as a coolant/lubricant, so have an assistant stand ready with an eye dropper of water. This operation puts quite a bit of stress on the wheel and the mandrel, so you will need to work very slowly, applying plenty of water. I recommend backing the knife out several times to allow the wheel and knife to cool.
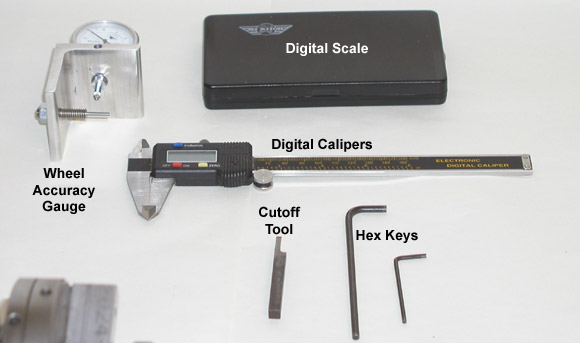
ACCESSORIES Several tools (shown in Figure 6) are handy when using a lathe.
Figure 6 - Accessories
1. Digital Calipers - These are an absolute necessity as they measure the diameter of the work piece (wheel).
2. Wheel Accuracy Gauge - Measures the run-out of the wheel before and after lathing.
3. Digital Scale - For weighing a wheel before and after lathing.
4. Cutoff Tool - For reducing the tread width.
5. Hex Keys - Used to adjust the lathe. Typically, the lathe will include the required keys.
In addition, spare cutting tools, and a good hone stone with cutting oil will be handy.
CONCLUSION Owning a mini-lathe is certainly not for everyone. But it can be very beneficial for pinewood derby wheel work.
I mostly use the Taig lathe, as it is convenient and relatively quiet. It is also quite portable, so that you can store it under your work bench, or transport it if needed. It works well for polishing axles and bores, and for the occasional machining job.
A feature article is a regular part of the Pinewood Derby Times Newsletter. To subscribe to this free e-newsletter, please visit: www.maximum-velocity.com/subscribe.htm