02
03
Pinewood Derby Stories and Photos from Maximum Velocity
04
05
15
16
19
20
21
22
23
24
25
26
27
28
31
32
33
34
Axle Installation Made Easy
Mounting axles in blocks with slots has always been problematic. Problems include damage to the car body, sore thumbs, non-symmetrical insertion (some axles angled, others not), bent axles, and uneven car-to-wheel gapping. I believe there is an easier way, so today's article will provide a game plan for both simplifying axle insertion and improving accuracy.
AXLE SLOT/HOLE PREPARATION
Whether your block is equipped with axle slots or axle holes, preparation is necessary to simplify and ensure proper axle installation. This preparation should occur before any other work is done on the wood block.
-- Axle Slots --
In order to firmly hold the axles, axle slots are typically cut narrower than the diameter of the axle. While this tightness is necessary, it increases the difficulty of installing the axles. So, to make the axles go in easier - and to minimize the risk of damaging the block or bending an axle - the slot must be accurately widened just a bit. This can be done in one of two ways:
Axle Method
One way to widen the slot is to use a hammer to tap a spare axle into the slot, pull it out with a pair of pliers, and then repeat for the other three positions. While this will work, it is not particularly accurate and can lead to block damage.
Pro-Body Tool Method
The preferred method to widen the slot is to use a Pro-Body Tool.(1) The Pro-Body Tool is a drilling guide, with which a drill bit is used to accurately widen the slot. It will also compensate for slots that are slightly out of square. To get a better idea as to how the Pro-Body Tool works, visit:
http://www.maximum-velocity.com/pro-body.htm
-- Axle Holes --
Similar to axle slots, in order to firmly hold the axles in place, axle holes are generally drilled smaller than the diameter of the axle. In addition, pine tends to 'relax' after it is drilled, so the final hole will tend to be slightly smaller than the drill bit. To open up the hole, tap a spare axle into the hold, pull it out with a pair of pliers, and repeat for the other three positions.
WHEEL/AXLE PREPARATION
Before installing the wheels and axles, complete all axle and wheel preparation steps. Then lubricate the wheels/axles while they are off the car. If you are unsure as to these preparation steps, they are covered in back issues of this newsletter, as well as in our booklet, "Speed to the Finish".(2)
AXLE INSERTION
Axles can be inserted by a variety of methods including pressing them in by hand, or pressing them in place with a vise or clamp. Regardless of the method, the gap must then be set between the car body and the wheel hub. The PineCar alignment tool can be used for setting this gap, or you can use a dime.
While these methods work, I would like to introduce you to a new method of axle installation using a tool called the Pro-Axle Guide.(3)
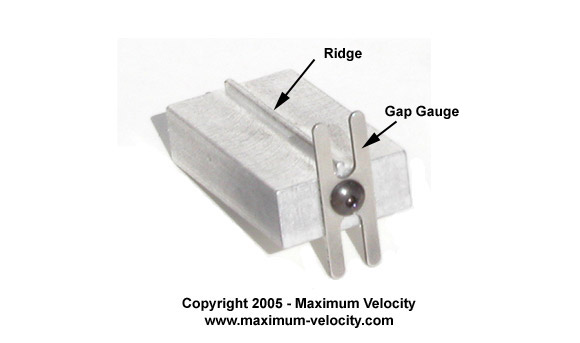
The Pro-Axle Guide is a tool to help insert axles with accuracy. The tool is equipped with a ridge to keep the axle at the correct depth in the slot, and is also equipped with a gauge for setting the proper gap between the car body and the wheel hub (see Figure 1).
Figure 1 - Pro-Axle Guide Components
The Pro-Axle Guide can be used for inserting axles in either slots or holes. When inserting axles into slots, the tool's ridge fits in the axle slot. When inserting axles into holes, the flat side of the tool is placed against the bottom of the car. In either case, to use the Pro-Axle Guide follow these steps:
1. Partially insert the axle into the slot/hole, and then place the tool on the bottom of the block with the gauge between the wheel and the car body.
Figure 2 - Preparing to Insert an Axle
2. Next place the axle head on a hard surface, such as a workbench or desk. While firmly squeezing the tool to the block, press down on the axle head. Continue pressing until the wheel hub rests against the gauge.
Figure 3 - Pressing the Axle into Place
3. For non-BSA wheels, the axle will need to be inserted a bit further. This can be done by pressing the axle head with a thumb or the handle of a small screwdriver.
4. Remove the tool and repeat for the other axles.
AXLE ALIGNMENT
Now that the wheels/axles are installed, but before they are permanently affixed, test and adjust the alignment of the car. To accomplish this, you may need to remove and reinstall the axles. If so, then repeat the process described in the previous step. If you are unsure as to how to align the car, there will be an article on alignment in a future newsletter, or you can find two documented procedures in our "Speed to the Finish" booklet.
SECURING THE AXLES
Finally, the axles must be secured in place. The method is different for axles slots versus axle holes.
-- Axle Slots --
Axles can be affixed in axle slots with some white (Elmer's) glue. Other glues can also be used, but I prefer white glue because:
- It is not permanent (like epoxy), so if necessary, the axles can be removed by grasping the axle head with a pair of pliers, slightly rotating the axle (which breaks the glue bond), and then pulling the axles out; and
- It is not runny (like superglue), so it won't sneak into the wheel bore and lock up the wheel.
To glue the axles, lay the car on soft rag with the bottom facing upwards. Place a dab of white glue in the slot area between the axle tips. Spread the glue over the top of the axles, but keep it away from the wheels. Remove excess glue with a rag, and then don't move the car until the glue is dry.
-- Axle Holes --
If axles are quite tight in the axle holes, then it is not necessary to glue them in place. But if your axles are not tight, or if you choose to glue the axles anyway, here is the procedure:
1. Remove an axle,
2. Put a small drop of white glue on a toothpick,
3. Insert the toothpick into an axle hole and swish it around,
4. Remove the toothpick, wipe off any glue on the side of the car, and
5. Reinstall the axle.
Again, I prefer white glue for the same reasons listed above.
CONCLUSION
Proper axle installation is extremely important to reach maximum velocity. I hope that you find the information in this article to be helpful, and that you have a successful race this year.