02
03
Pinewood Derby Stories and Photos from Maximum Velocity
04
05
15
16
19
20
21
22
23
24
25
26
27
28
31
32
33
34
Let's Light it Up
By Randy Davis
Driving down the road, every vehicle you see has white headlights and
red taillights. Not only are these lights mandated by law, but they
greatly increase the visibility of the car for improved safety; and at
night, headlights are needed to help you see where you are going.
Of course, none of this is necessary for pinewood derby cars. But if
you did have lights on your car, you would certainly increase the
car's visibility!
In today's article, we will be reviewing four products that are
available for adding lights to your car. We will be looking at cost,
quality, ease of implementation, and ease of use.
SOME CAVEATS
First, there is no perfect solution for pinewood derby lighting. All
methods require some careful planning and woodworking.
Second, if your race will not be held immediately after the check-in
(in which case you would turn on the lights before turning in the
car), make sure that you will be allowed to turn on your lights prior
to the race (or make sure an official will do that for you). It would
be a real disappointment to implement lighting, and then find that you
were not able to turn on the lights after the car was checked in.
Finally, implementing lighting does add some weight to the car in
undesirable locations. However, the products are light-weight, so
likely the effect is quite small.
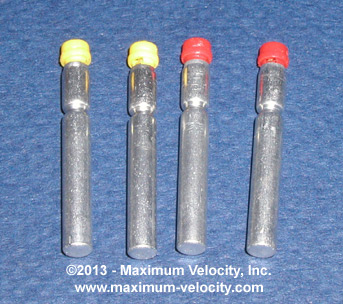
PRODUCT 1 - Fishing Bobber Light Refills(1)
Although the manufacture certainly never thought of pinewood derby
racing when developing this product, bobber light refills are one of
the easier ways to add lights to your car. These refills consist of a
metal tube holding a battery and an LED. The LED is pushed inwards to
turn on the LED, and then pulled outwards to turn it off. The tubes
are just over 1-1/4 inch long and fit nicely in an 11/64 inch hole.
They are available in yellow, red, and green.
Figure 1 - Bobber Lights
For my implementation, I purchased two yellow and two red - too bad
there is no white. Two holes were drilled into the front and back of
the block to accept the lights. But in order to turn them off and on,
you must be able to remove them from the car. So I added access holes
in the bottom of the car. After the lights are installed (don't glue
them in - press fit only), a small screwdriver can be used to push
them back out of the car so the lights can be turned off or on.
Figure 2 - Bobber Lights Installed(2)
Figure 3 - Bottom of Car
Cost - $20.95 for four lights; includes First Class Mail Shipping
Quality - The lights work and are very bright. They are advertised to
last 21+ continuous hours of use.
Ease of Implementation - The easiest of all products to install, just
drill the four light holes, plus access holes.
Ease of Use - Each light must be individually turned on. They cannot
be glued in place, so the light holes must be exactly the right size.
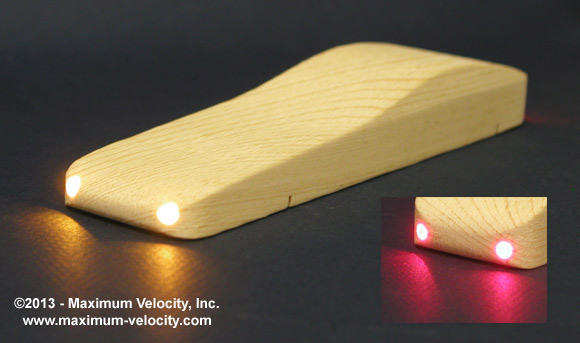
PRODUCT 2 - Pinewood Headlights(3)
Pinewood Headlights consist of a circuit board with two attached,
white LEDs. A coin battery is installed on the circuit board. Also
included are instructions, double stick tape, and a spare battery
(nice touch). There is no switch; the lights are turned on by removing
a plastic tab, and turned off by replacing the tab.
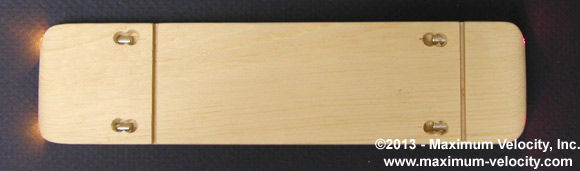
To install the lights, two 1/8 inch holes were drilled into the front
of the block. A pocket was then created on the bottom of the block to
accept the circuit board. The depth of the pocket must be accurately
measured so that the board sits on the bottom of the pocket with the
LEDs inserted into the holes. I put a thin layer of wood filler in
the bottom of the pocket so that the double stick tape (included)
would have a smooth surface on which to stick.
Figure 5 - Pinewood Headlights Installed
Figure 6 - Bottom of Car
Cost - $12.00 for one set of headlights; includes First Class Mail
Shipping
Quality - The lights work and are very bright. The battery life is
estimated to be 10 hours. Note that no taillights are available.
Ease of Implementation - Because the lights are attached to the
circuit board, the pocket for the circuit board must be placed very
close to the end of the block. This can be difficult to do without
damaging the wood.
Ease of Use - Once installed, the lights can be turned on by removing
the tab. But to turn off the lights, or to replace the battery, the
circuit board must be removed. So the board cannot be permanently
glued into place (double sided tape is provided for installation).
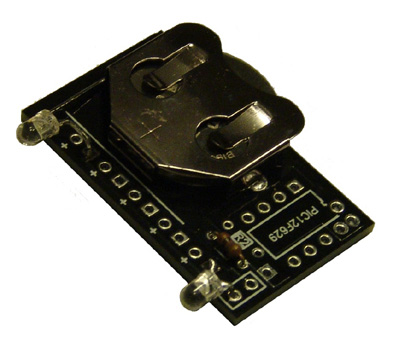
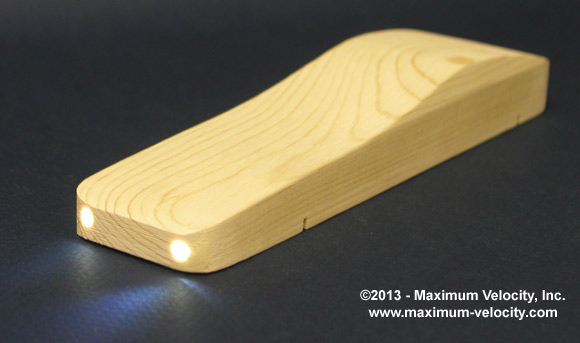
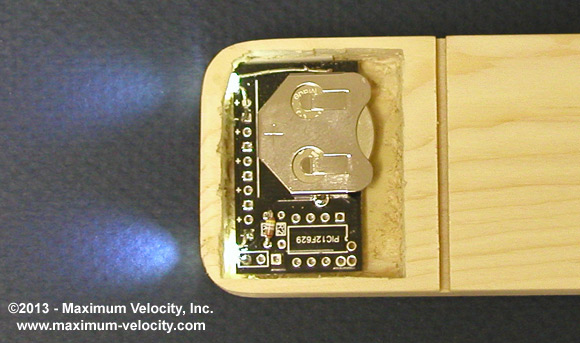
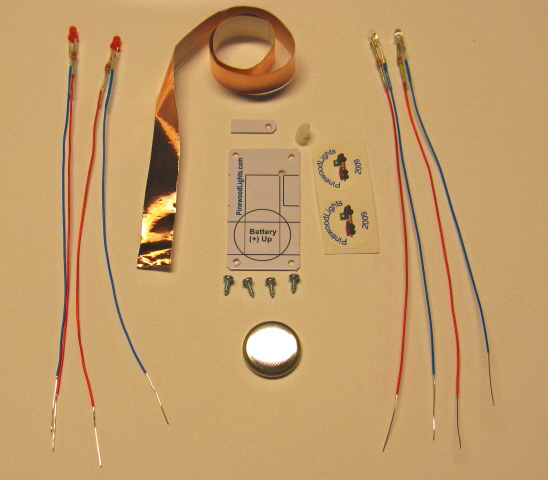
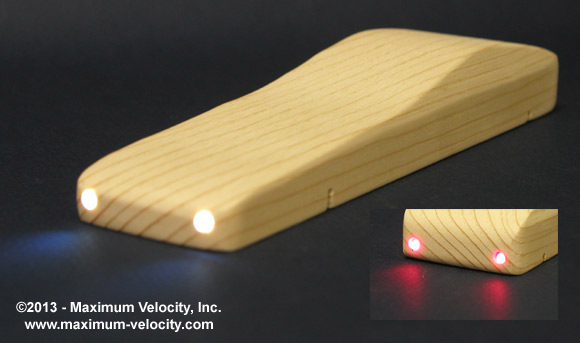
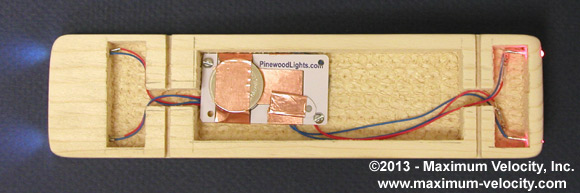
PRODUCT 3 - Pinewood Lights(4)
Pinewood Lights consist of two white and two red LEDs, a do-it-
yourself circuit board, a battery, screws for attaching the board to
the car, and instructions. The completed circuit board includes a
power switch.
To install the lights, light holes were drilled with a 5/32 inch drill
bit. Next, pockets were created under the car to hold the circuit
board and for access to the lights. Finally, channels were machined
from the light holes to the pocket. The circuit board was then
constructed following the provided instructions.
Figure 8 - Pinewood Lights Installed(5)
Figure 9 - Bottom of Car(6)
Cost - $11.90 for one set of headlights and taillights; includes First
Class Mail Shipping
Quality - The lights work and are bright. The battery life is
estimated to be 20 hours.
Ease of Implementation - The instruction booklet is 16 pages long, and
seems quite complex. But after doing the project, I realize that many
of the pages explain the engineering/science of LEDs and circuit
boards. If you are all thumbs, this product is probably not for you.
But anyone with some handiness should be able to pull it off. But
note that because of the wiring, quite a bit of underbody woodworking
is required.
Ease of Use - Once installed, the lights can be turned on or off with
a switch on the circuit board. But to replace the battery, a piece of
copper tape must be cut, removed, and then replaced. To do this the
board would need to be removed from the bottom of the car (4 screws -
I only used two in Figure 9). Extra copper tape is provided.
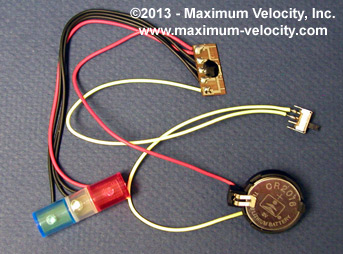
PRODUCT 4 - Flashing Light Bar(7)
The Flashing Light Bar consists of a pre-wired light bar, switch,
circuit board, and battery holder. Two batteries (included) are
required. When turned on, the light bar flashes red, blue, and white
in sequence.
Figure 10 - Flashing Light Bar
To install the light bar, a hole (actually a slot works better) was
drilled into the top of the car and continuing into a pocket under the
car. But how do you get the wires fed through the top of the car?
Well, according to the instructions, you cut the wires, feed them
through the hole, and then twist them back together again (applying
electrical tape - not supplied).
Figure 11 - Flashing Light Bar in Action(8)
Figure 12 - Bottom of Car(9)
Cost - $15-20 from various retailers. Includes First Class Mail
Shipping
Quality - The lights work and are bright. No estimate is provided for
the battery life. The quality of the unit itself is iffy. The one I
purchased had a corroded switch, the light cover was detached from the
light bar circuit board, and one of the wires had to be re-soldered to
the light bar circuit board.
Ease of Implementation - The product is straightforward to implement,
although having to cut and splice wires is not the best solution
(a simple plug connector would be a much better solution). Coupling
this with the quality issues, this product is recommended only for
handy people.
Ease of Use - Once installed, the lights can be turned on or off with
a switch. The batteries are easy to replace.
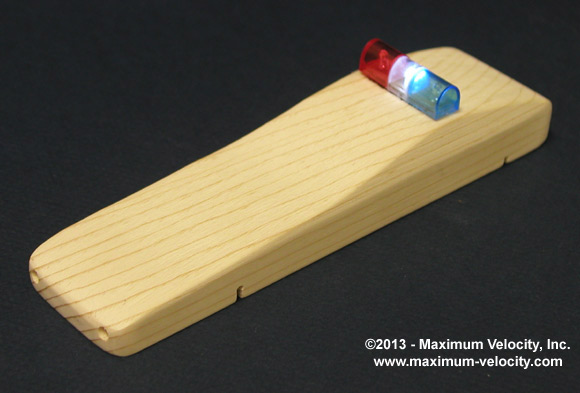
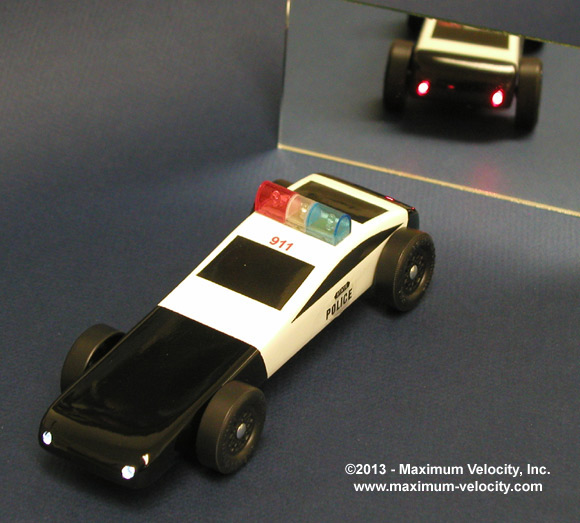
Bringing it All Together
It seemed a shame to have these products and not make a completed car
so I chose two of the products to implement a police car. Obviously
the light bar was used, but I chose the "Pinewood Lights" product as
it had both white headlights and red taillights.
The resulting car is shown in Figure 13 and 14. A video of the lights
is available Here
(5.6 MB, 5 seconds)
Figure 13 - Completed Police Car
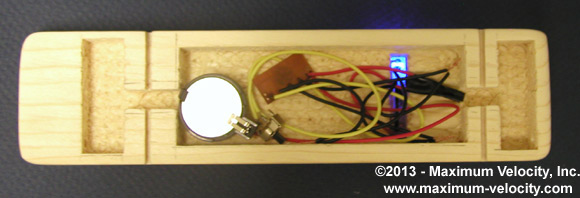
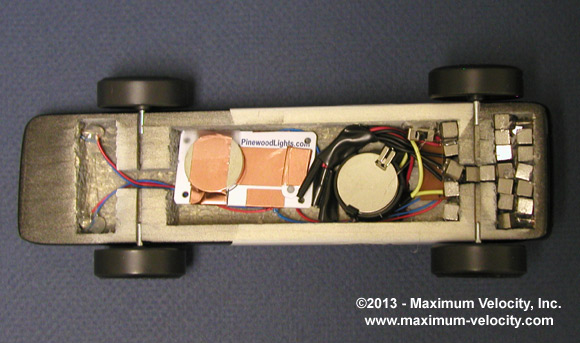
Figure 14 - Bottom of Completed Police Car(10)
CONCLUSION
If you want to light up your car, there are several readily available
products to choose from. But make sure to do your homework and select
the product that is best for you.
(1) Can be purchased from several on-line stores. I purchased
mine from gandermoutain.com
(2) Headlights are yellow and the taillights are red. LED light
does not photograph well.
(3) Available from derbylights.com. This company also offers a set
of scanner lights, which look very cool. They install in a similar way
to the headlights.
(4) Available from pinewoodlights.com
(5) Headlights are white and the taillights are red.
(6) I made the rear pocket for weight; it is not required for the
lights as the main pocket could have been used for access (the rear
light holes could have been drilled all the way to the middle pocket
as long as they are drilled high enough to clear the rear axle slot.
The middle pocket is larger than necessary; you will see why later in
the article.
(7) Manufactured by Amenco. Available at many on-line and walk-in
hobby stores.
(8) The photo doesn't really do the product justice. See the
video later in the article.
(9) I didn't make the wiring neat, as this was just a temporary
installation for the photos.
(10) The weights are not very neatly placed. Normally, I use epoxy
for weight, which allows time to reposition the weights. But for this
project I used hot glue so that I could remove the weight if there was
a problem with the lights. Hot Glue holds well, but gives virtually
no time for adjusting the weight.