02
03
Pinewood Derby Stories and Photos from Maximum Velocity
04
05
15
16
19
20
21
22
23
24
25
26
27
28
31
32
33
34
Shop Talk: How to Tune a Band Saw
By Randy Davis
Back in my early days of pinewood derby racing I attended a workshop
and offered to help some folks cut out their cars. The saw that was
to be used was a bench top band saw. Unfortunately, the blade was
really too small for cutting blocks. But even worse, the blade was
not properly tensioned and the guides were not set right. So the
blade moved all over the place, making it very difficult to use and
making it quite unsafe. I am still amazed that the blade didn't jump
off the wheels.
Since then I have learned quite a bit about adjusting band saws (some
from the "school of hard knocks"). Band saws are great for cutting
out cars, albeit a saw that must be used with great care. But if the
saw is not adjusted correctly, then it can really be a dangerous tool.
So, let's look at the basic steps of adjusting a blade.
BLADE SELECTION
For most pinewood work, I recommend a Skip Tooth, 3/8 or 1/2 inch
blade, with 4 teeth per inch. However, the steps below apply to any
blade. For more discussion on band saws and blades, please see: Choose the Right Band Saw for Pinewood Derby Cars in Volume 12, Issue 2.
BLADE TRACKING AND TENSION
After selecting the blade, it must be mounted on the wheels, and then
adjusted so that it runs in the center of the wheels (tracking) and
has the correct tension. Each time a blade is changed on the band
saw, this procedure must be followed.
Tracking and tension should be adjusted together. So, you must
incrementally increase the tension of the blade while adjusting the
tracking.
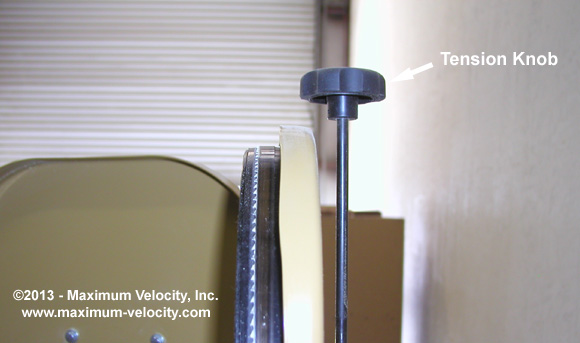
Figure 1 - Tension Knob
First, unplug the band saw, then slide the blade into place. Next,
apply a small amount of tension, and then rotate the upper wheel by
hand. As needed, adjust the tracking knob to move the blade to the
center of the wheel (normally a clockwise rotation moves the blade
outward, counterclockwise moves the blade inward). Keep rotating the
wheel, adding tension, and adjusting the tracking knob until the blade
is under full tension and tracking in the middle of the wheel.
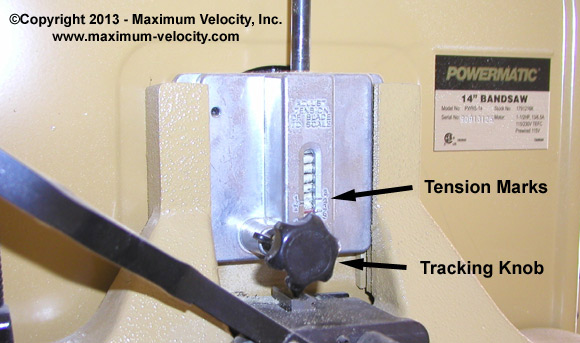
Most band saws have tension marks to show the proper tension for each
blade width. Make sure to set the tension properly. Both over and
under tensioning can result in blade breakage, and under tensioning
makes cutting difficult and dangerous.
Figure 2 - Tension Knob and Marks
After achieving the proper tension, test the tracking under power.
Close the wheel covers and plug in the saw. Turn on the saw for a few
seconds and then turn it off again. Open the top door and check the
position of the blade. Make an adjustment if needed.
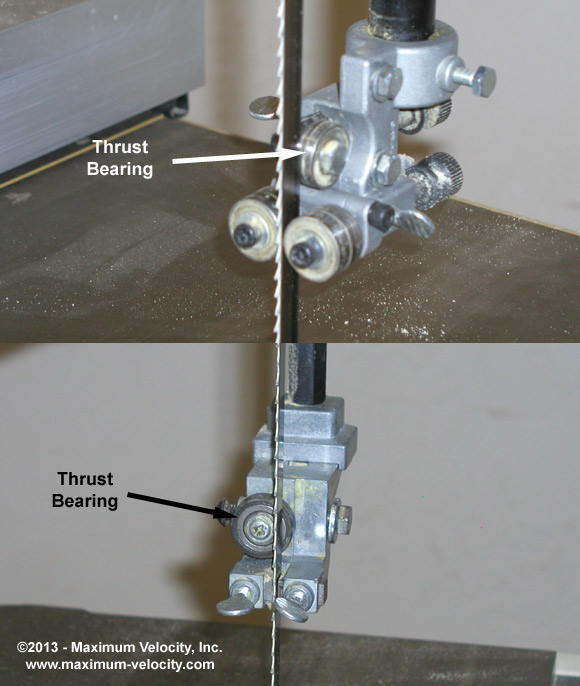
THRUST BEARINGS
The thrust bearings are the (normally two bearings, one is above and
the other below the table) wheels that sit behind the blade. These
bearings keep the blade from moving backwards when cutting. On some
saws, the blade contacts the outer diameter of the bearing. On others,
the blade contacts the face of the bearing.
Figure 3 - Thrust Bearings
While idling, the blade should sit just in front of the bearings.
Contact with the bearing only occurs when the blade is cutting.
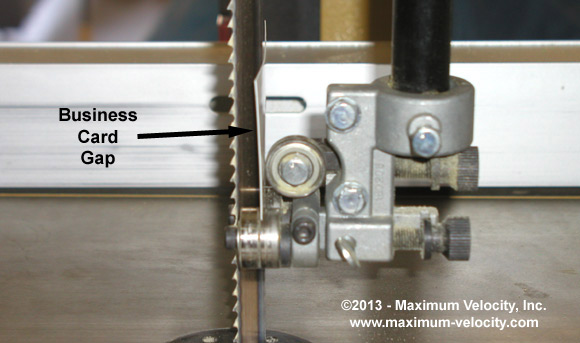
To adjust the thrust bearings, set the guide assembly about 1/4 inch
above the saw table. Adjust the top and bottom thrust bearings so
that they are just behind the blade. A business card makes a good gap
gauge. Check your work by turning the saw on and off and watching the
thrust bearings. They should not rotate.
Figure 4 - Thrust Bearing Gap
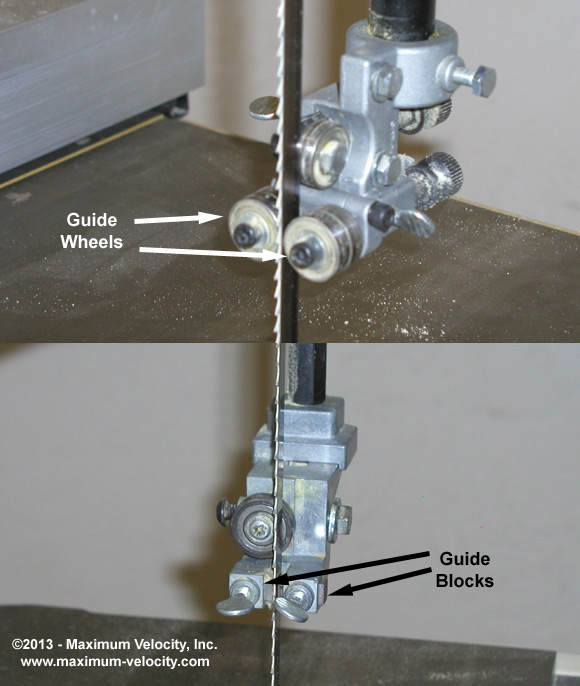
SIDE GUIDES
The side guides keep the blade from moving left or right while
cutting. More expensive saws use guide wheels as side guides, while
less expensive saws use guide blocks.(1)
Figure 5 - Guide Wheels and Blocks
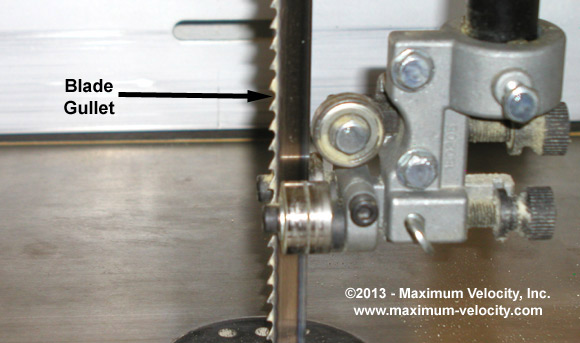
To adjust the guides, first move the guides until the front edge is
just behind the blade's gullet (curved indent in the blade). This is
very important. If the teeth of the blade contact the guides, the
blade will become dull very quickly.
Figure 6 - Side Guide Front/Back Position
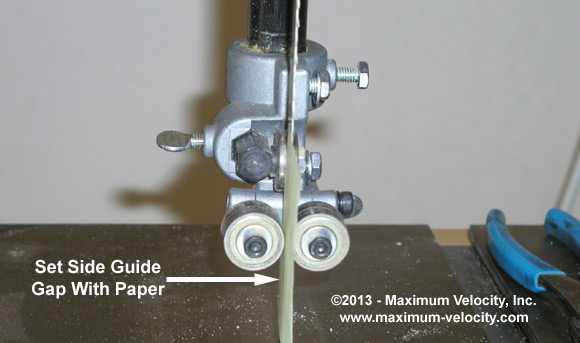
Next, adjust the distance between the guide and blade. As with the
thrust bearing, when idling the blade should not touch the side
guides. Set the gap between the side guides and the blade to the
thickness of a piece of paper. Make sure to set the gap on both of the
upper guides and both of the lower guides. Again, check your work by
turning the saw on and off and watching the thrust bearings. They
should not rotate. With guide blocks, no contact noise should be
heard.
Figure 7 - Side Guide Gap
CONCLUSION
Now that the band saw is properly adjusted, you are ready to cut out
some cars. Remember to keep safety at the forefront by wearing safety
glasses, not wearing loose clothing or jewelry, tying up long hair,
and keeping your fingers away from the blade.
If you would like more information on this topic, there is a great
article on the American Woodworker site posted at:
http://americanwoodworker.com/blogs/tools/archive/2010/03/15/tune-
your-bandsaw.aspx
(1) Guide blocks wear out, so they must be adjusted regularly. They
will eventually wear out and need to be replaced.