02
03
Pinewood Derby Stories and Photos from Maximum Velocity
04
05
15
16
19
20
21
22
23
24
25
26
27
28
31
32
33
34
Top Fuel Cars - Direct Drive
(The fifth in a series of articles on cars that "stretch the rules")
Last summer I was searching the web for articles and Blogs relating to pinewood derby racing. Most of what I find is not particularly interesting, but occasionally I come across a real gem.
One of these gems was an article written by Eldon Goates, owner of Synthesis Engineering Services. Eldon decided to use PRO/Engineer design software to design a top-performing, direct-drive pinewood derby car for an outlaw race. After designing and building the car, he wrote an article describing the process for Pro/E magazine. You can find the entire article Here
Although I do not have the sophisticated equipment available to Mr. Goates, I decided to make my own version of the car using a pinewood derby block. I do have a lathe to make a few of the key parts, but otherwise, the car was made with basic shop tools.
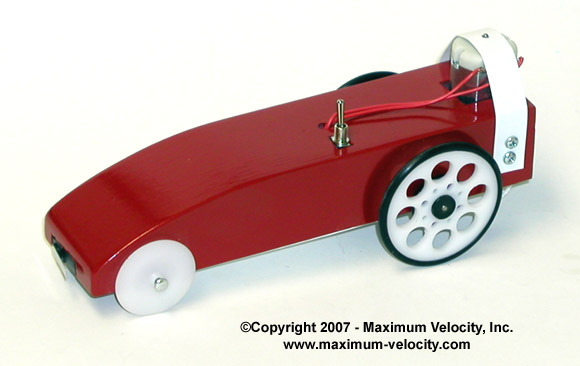
Figure 1 - My Direct Drive Car
CAR DESIGN
The basic premise of the car is that a string is wound around the rear axle and is attached to a spool mounted onto a motor. When the motor is turned on, the string is wound onto the spool, causing the rear axle to rotate. The length of the string is set such that it runs out just as the car crosses the finish line. So, if the car was used on a track of a different length, the string would need to be adjusted.
The unique feature of this car design is the axle "transmission". To understand how this works, think of a ten speed bicycle. When in a low gear (more torque, less speed), a smaller front "motor" sprocket (the motor is a pedaling human) and a larger rear "drive" sprocket (attached to the rear wheel) is used. But in a high gear (less torque, more speed), a larger front sprocket and a smaller rear sprocket are used.
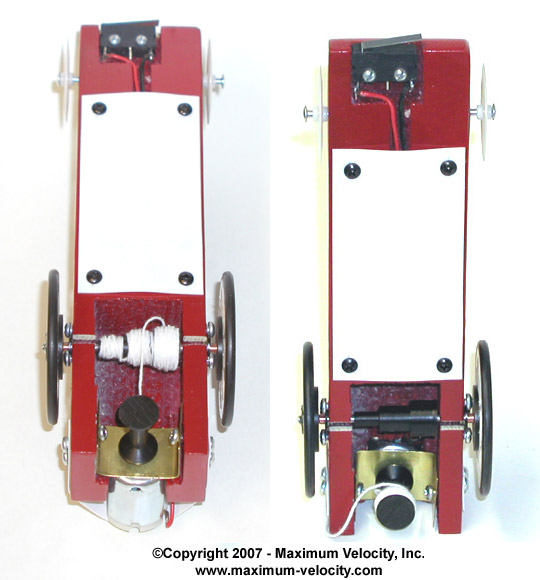
Now adapting this concept to the direct drive car, at the starting line a low gear is wanted. This means that a smaller motor sprocket and a larger drive sprocket are needed. The smaller motor sprocket is simple; it is just the empty spool attached to the motor. The larger drive sprocket is accomplished by creating a larger rear axle (the right side of the transmission seen in Figure 4). Conversely, near the finish line, a high gear is desired - a larger motor sprocket and a smaller drive sprocket. This corresponds to the nearly full spool on the motor, and a smaller rear axle (left side of the transmission).
To make this work, the string is first wound around the smaller (left) portion of the transmission. Next, the middle portion is filled, followed by the larger portion. When in motion, these are, of course, unwind in the reverse order. The only trick is to make sure to rotate the rear wheel in reverse when winding. Otherwise the car will go backward!
PARTS
First I needed to collect and/or manufacture the various parts. These included:
- Basic block: This was drilled and milled to hold the parts.
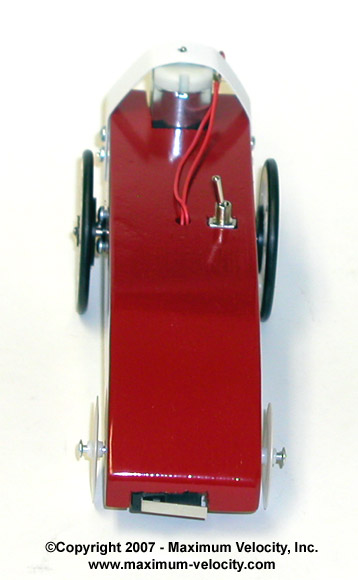
- Starting Pin Switch: I used a contact switch (part #275-016 at Radio Shack). It is normally on. When the car rests against the starting pin, the weight of the car closes the switch turning the motor off. Thus, when the pin drops, away it goes. This switch can be seen in Figure 2.
- Kill Switch: A small toggle switch (part #275-624 at Radio Shack) that is used to turn the motor off when not in use. Just make sure to turn it on at the starting gate!
- Batteries, 9V clips and cover: Two standard 9V batteries with 9V clips are located in the bottom of the car, hidden by a cover plate of styrene plastic (see Figure 4).
- Motor: 12 VDC motor, I drove the motor at 18V for more power. This would eventually burn out the motor, but the on-time is so short that the motor doesn't get a chance to overheat.
- Motor Harness: The motor is mounted on a piece of brass, fastened to the block, and held down by a piece of styrene.
- Axles: Front axles are our 4095-Speed Axles. The rear axle (one piece) is a piece of 3/32 steel rod.
- Bearings: Two bearings are attached to the side of the car in the rear (I used small screws to catch the flange of the bearing). Thus, the entire rear assembly (wheels, axle, and axle transmission) rotate as a unit, supported by the bearings.
- Bushings: The axle was a bit loose on the bearings, so I inserted two short pieces of copper tubing between the wheels and the bearings to keep the axle assembly from shifting left or right.
- Wheels: The front wheels are white RS wheels from DerbyWorx. The rear wheels are two inch servo wheels from Pitsco. This larger size was needed so that the string spool would clear the center guide rail (it also helped performance). I had to make bushings of black Delrin so that the 3/32 inch axle rod would press fit into the wheels. You can see one of the bushings in Figure 1.
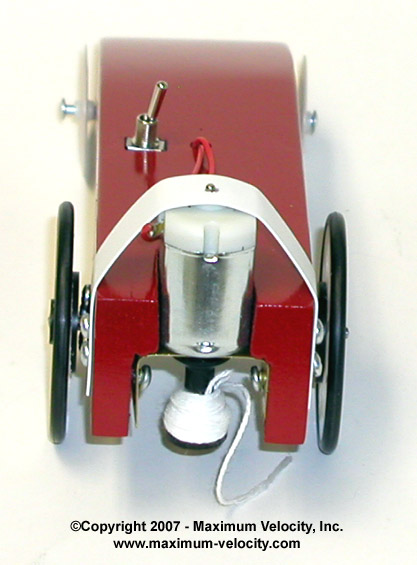
- String Spool: This piece presses onto the shaft of the motor (Figures 3 and 4). It was machined from Delrin. A hole is drilled through the spool. The string is threaded through the hole, and then tied in place.
- Axle Transmission: This piece was machined from Delrin (see Figure 4). It was then slid onto the rear axle and permanently attached with epoxy. There is a hole drilled into the transmission into which the tip of the string is inserted before winding.
- Wiring: Light gage electronics wire. Positive side of the battery goes to the Kill Switch, then to the Starting Pin Switch, then to the motor. The negative wire goes to the motor. Batteries are wired in series.
- String: I used some strong kite string. It tends to fray, so dental floss, or another type of non-fraying string would be better.
Figure 2 - Front of Car
Figure 3 - Back of Car
Figure 4 - Bottom of Car
Left Photo - String is wound and car is ready to go
Right Photo - At end of run, string is wound around the motor spool
PERFORMANCE
I ran this car on our 32 foot aluminum track, and it was faster than all of my propeller cars (see Pinewood Derby Times Volume 6, Issue 15 - April 18, 2007).
Unfortunately, the car sat a little too high, so it would not go under the timer.
Against a fast gravity-powered car, it wins by nearly two track sections (about 14 feet). Here is a Quick Time Video (.mov extension) of the direct-drive car racing against a fast gravity car.
CONCLUSION
This was a fun and challenging project. Certainly my car is not elegant like Eldon's, but it got a lot of attention at our race in April 2007 - it confounded kids and parents alike. "How does it go so fast?," was a common response.
By the way, if you build a direct drive car based on this design, or a different design, please send me an e-mail with a description and photos.