02
03
Pinewood Derby Stories and Photos from Maximum Velocity
04
05
15
16
19
20
21
22
23
24
25
26
27
28
31
32
33
34
SHOP TALK
Measuring for Success
Making a pinewood derby car calls for a number of measurements, and marking several cut lines and drilling marks. Although this seems like a simple part of building the car, making accurate measurements quickly and repeatedly takes some practice, the knowledge of a few tips, and the proper tools.
Today, we'll focus on measurement tips; tools will be discussed in a future Shop Talk.
MAKING A MEASUREMENT
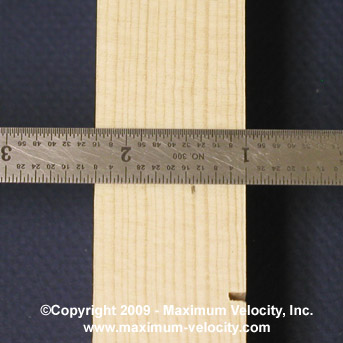
A typical measurement for a pinewood derby car is measuring off the bottom of the block for drilling weight holes in the side or back of the car. Let’s say you want to measure 7/16 inch off the bottom to locate a weight hole. Where do you start the measurement from? Typically, one would align the end of the ruler on the bottom of the block, and then make a mark at the 7/16 inch tick mark. This will work, but it is not necessarily accurate for several reasons. First, the end of the ruler (especially on an inexpensive ruler) is not precisely ground. Second, ruler ends are often a bit chewed up. Finally, it can be awkward to align and hold the end of a ruler on the edge of the block.
A more accurate technique is to align one of the inch marks (typically the 1 inch mark) with the edge of the block, then make the pencil mark at 1-7/16 inches. This will work for any measuring or marking task. But if you are measuring, make sure to subtract one inch to get the correct measurement.
Figure 1 - Making a 7/16 inch Measurement
DRAWING A HORIZONTAL LINE
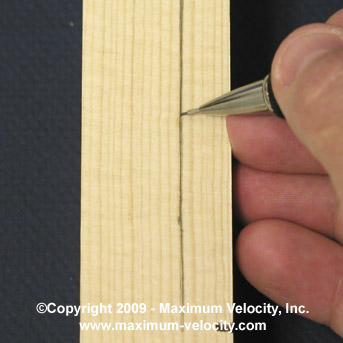
Let’s say that you want a pinewood derby car to be 7/16 inch thick. Sounds easy; just measure 7/16 up the side, draw a line, and cut. But there are a couple of ways to do this, depending on the accuracy needed. If you don't need any significant amount of accuracy (e.g., a line is needed for a rough cut), then an easy way to draw the line is to measure at one spot on the block, then use your fingers to guide the drawing of the line. Just place the pencil at the marked location, place the tip of your middle finger along the side of the block, lock your fingers in place and draw.
Figure 2 - Finger Method
With a little practice, this will result in a reasonably accurate line. If you need to repeat the line (other side of the block, or a different block), just keep your fingers locked and keep drawing.
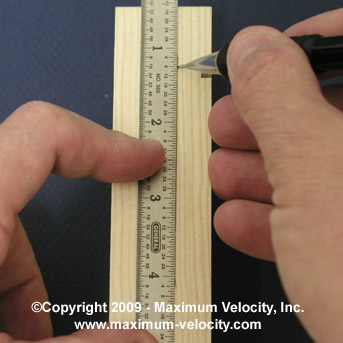
For a more accurate line, measure at two points on the block, place the pencil tip at one of the marks, slide a ruler against the pencil lead, align the ruler with the other mark, and then draw. If the ruler is firmly held in place, then this will result in a quite accurate line.
Figure 3 - Two Point Method.
An even more accurate way to draw horizontal lines will be discussed in the next Shop Talk.
DRAWING A CENTER LINE
Oftentimes a horizontal line is needed down the dead center of the block. This is useful when drilling weight holes on the bottom of the block. Either of the previously mentioned methods can be used, however, since blocks are not always exactly 1-3/4 inches wide, another method can be used to get more accuracy.
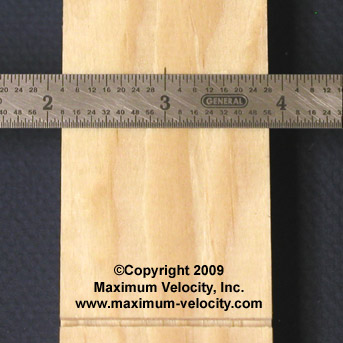
Using the Two Point Method, instead of measuring 7/8 inch from one side of the block, place one of the inch marks on the ruler at the approximate center of the block. We'll use the 3 inch mark on a 6 inch ruler, but it can be any inch mark. Then adjust the ruler so that the 2 and 4 inch marks extend off the block the same distance. Make a pencil mark at the 3 inch mark, which will be the center of the block.
Figure 4 - Locating the Center
Repeat this technique at another spot on the block, and then connect the two marks.