Wind Tunnel Testing
In a previous article (Volume 3, Issue 9 – The Big Debates: Aerodynamics), I shared the results of track tests using a car with a varying cross-section. The tests showed that there is an aerodynamic effect on the speed of the car, and the effect was virtually linear with regard to the area of the cross-section.
However, since aerodynamics is just one of many factors affecting the performance of a pinewood derby car, it is virtually impossible to gather any more meaningful data regarding the effect of aerodynamics using track tests. What is the recourse? A wind tunnel!
WIND TUNNEL DESIGN
Wind tunnels can be quite sophisticated (and expensive). So I chose to build my own using some clever information that I found on the internet.
Figure 1 shows the overall wind tunnel. On the left is a high velocity blower fan that I purchased at Sam’s Club. The acrylic door provides access for placing the car into the tunnel. The digital scale is used for measuring the force on the car (more on this later). The total cost to build this wind tunnel was less than $120, with the major portion being the blower fan and the digital scale (of course I had a few of those lying around).
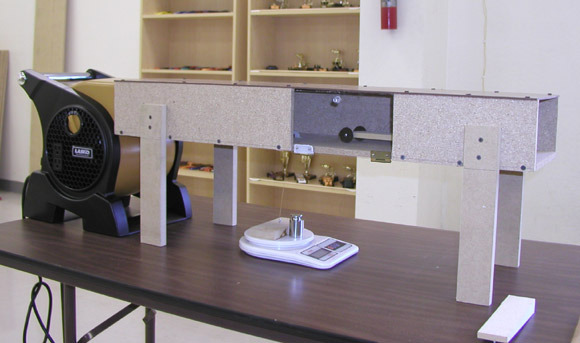
Figure 1 - Wind Tunnel
Figure 2 shows the inside of the tunnel and the air flow grid. The purpose of the grid is to align the air flow parallel with the tunnel to minimize turbulence. The grid is especially important when using a standard bladed fan, but is likely less important when using a blower fan. The grid is made from a fluorescent light diffuser. I cut three equal-sized pieces and then super-glued them together to increase the thickness.
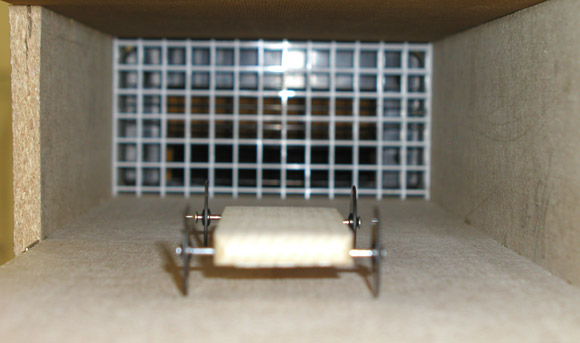
Figure 2 - Flow Grid
Figure 3 shows additional inside detail. The car is attached to a thread which runs over a lightweight, lubricated pulley and down to the scale. An eye hook is screwed into the bottom of the test car, and a small hook is tied to the end of the thread.
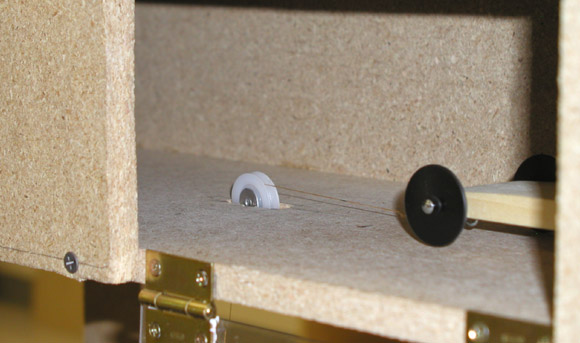
Figure 3 - Interior Detail
Figure 4 shows the scale. The board with the eye hook is glued to the scale. When the scale is turned on, it will zero. It is of course important to make sure there is no pull on the thread while the scale is zeroing. A weight (in this case a 200 gram weight) is then placed on the scale and the reading is recorded. When the fan is started, the car will pull on the thread, unloading the scale. To calculate the force on the car, the new reading is subtracted from the baseline reading previously recorded.
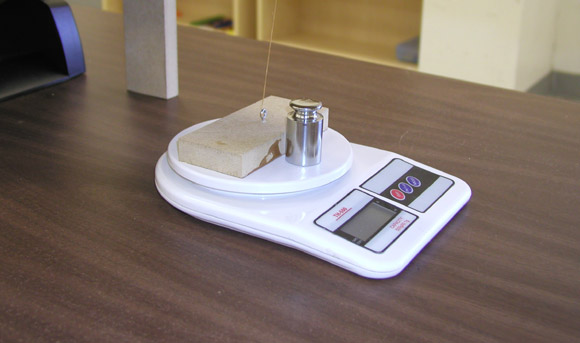
Figure 4 - Scale Detail
There are two additional factors to note. First, because I could not measure wind speed, the results from this wind tunnel cannot be compared with those from another tunnel. Secondly, I used Outlaw style wheels so that the cross-sectional area contributed by the wheels would be minimized. This amplifies the effect of the body shape. If standard (e.g., BSA) wheels are used, the cross sectional area is increased. This will lessen the percent difference in the cross-sectional area between the wedge and the wing, resulting in closer numbers.
TEST DETAIL
To ascertain the aerodynamic effect on various shapes, I prepared the car bodies shown below. Each car weighed 5.0 ounces and the balance point was essentially 1-1/4 inches front of the rear axle. The cross section (in square inches) of each body is listed.
Block - 2.510 - Blunt Front and Rear
Wedge - 1.580 - Blunt Front and Rear
Wedge - 1.480 - Tapered Front and 180 Degree Rounded Rear
Wing - 0.740 - Tapered Front and Blunt Rear
Wing - 0.740 - Tapered Front and 180 Degree Rounded Rear
A set of our Outlaw wheels and axles were lubed with NyOil II were used for every experiment. As you can see in Figure 2, I didn’t insert the axles all the way as I wanted to minimize any possible damage to the axles during removal.
For each test, the car was placed into the tunnel and aligned parallel with the walls. The thread was attached, the scale zeroed and then loaded, and then the wind was applied. Once the scale reading stabilized, it was recorded. During the experiment I found that the reading fluctuated, so the average reading was used. It’s interesting that the amount of fluctuation was greatest for the least aerodynamic car (the block), and was virtually zero for the most aerodynamic (the rounded Wing). I believe the fluctuation is due to wind eddies that occur as the air moves around the car. So the smoother the path, the fewer eddies occur.
TEST RESULTS
The test results are shown in Figures 5 and 6. Note that Figure 5 shows the actual force on the car (that is, the amount of wind drag) in ounces. This is the reading that affects how fast the car goes. The numbers in Figure 6 show the forces divided by the cross sections, and are in ounces per square inch. These numbers relate to the efficiency of design. Note that I tested the rounded wedge forwards and backwards. I had expected the result to be the same, but as you can see the forward facing numbers are better. I believe this is due to the importance of having a rounded rear. If the front of the wedge had been rounded instead of tapered, the forward and backward numbers may have been better.
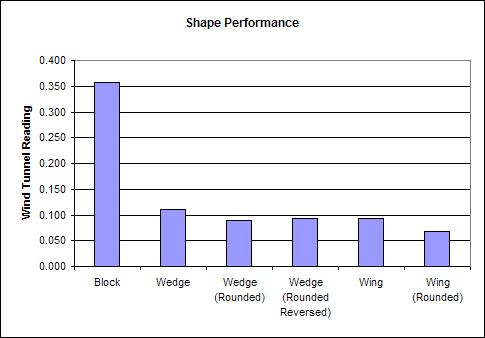
Figure 5 - Shape Performance
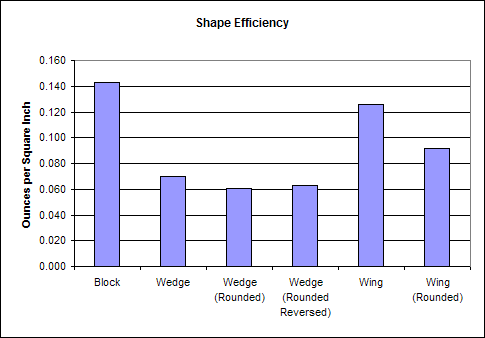
Figure 6 - Shape Efficiency
INTERPRETATION
Here is my interpretation of the results:
1. The car with the least wind resistance is the rounded wing. However, the most efficient design is the rounded wedge. This design channels the air the most efficiently; however, due to the larger cross-section it would still run slightly slower than the wing.
2. A rounded rear is extremely important to fast speeds and efficient air movement. I was surprised to find that the rounded wedge performed better than the standard wing. But simply rounding the rear of wing significantly improved both the performance and efficiency.
So, if you want the fastest car, keep the cross section small, and round the rear end. This will give you the best bet for a fast car!
From Pinewood Derby Times Volume 5, Issue 9
Subscribe to this Free Pinewood Derby E-newsletter
(C)2013, Maximum Velocity, Inc. All rights reserved.
Maximum Velocity Pinewood Derby Car Plans and Supplies